Setup
Prerequisites
To be able to run TimeKex, a running instance of Kimai is required together with a user and an API key of this user. The API password can be set in Kimai via "profile", "API" and then "API Password". As "billable = true" is used for the timesheet entries, user must have grated the corresponding role. You find this setting in Kimai "System" -> "Roles" -> "edit_billable_own_timesheet". Set this to "yes" for users.
There is a stable demonstration version available for Kimai which can be used for demonstration purposes (linked here). To checkout demo users and specifically the API password of a demo user, check the demo information page.
Local Development and Compilation
TimeKex is a ReactJS Web Application. To run a local development version, you can use NPM to install all dependencies and start or build the app.
- Make sure to have NPM installed
- Download/clone this repository to a folder
<folder> - Open the command line, go to that folder (cd
<folder>) - Install packages using
npm install - Start the development server with
npm start - Build the app via
npm run build
Copy & Paste Installation
The build and deployed homepage is available via GitHub pages in the gh-pages branch. The TimeKex application is there available in the app folder (https://github.com/KatjaGlassConsulting/TimeKex/tree/gh-pages/app). You can download and copy all files from the app for example into kimai/public/timekex. Then you can start TimeKex on this web server using your kimai URL, but inlcude kimekex/index.html in the URL, for example: https://example.kimai.de/timekex/index.html. You must update the configuration to fit your needs. It is very important to update the kimaiAPI. If you host kimai under https://example.kimai.de, then the api would be located at https://example.kimai.de/api/.
var config = {
    "kimaiAPI" : "https://demo-stable.kimai.org/api/",
    "ignoreActivities" : ["Vacation","Public Holiday"],
    "adminUser" : ["anna_admin","susan_super"],
    "approval" : false,
    "overtime" : false,
    "summary15mins" : false,
    "breakChecks" : false
}
CORS
It is meant to run TimeKex on the same server as Kimai, then you will not have issues with CORS. You could for example put the build folder in a folder "timeKex" under your kimai public folder. If you run it on different servers, make sure to enable CORS from what ever URL you have.
To be able to run the demonstration which is accessing a different server, you need to start a browswer without security settings. If you are using Chrome with the default paths, you might be able to start a chrome with disabled security this way:
"C:\Program Files\Google\Chrome\Application\chrome.exe" --user-data-dir="C:/temp/chrome_session" --disable-web-security
Deployment
The TimeKex web application is a simple static HTML fileset which can run locally or on any Webserver. When you have build the app, it can simply be started by opening "index.html".
The final build folder contains next to the config.js also additional example configurations files which you might want to try. Just copy the content as config.js to apply the corresponding configuration. The current configuration files are using the Kimai demonstration server and users.
Configuration
There are some configurations possible which are set through a config.json file in the root folder of the application. Possible settings are explained here.
var config = {
    "kimaiAPI" : "https://XXX/api/",
    "ignoreActivities" : ["Vacation","Public Holiday"],
    "adminUser" : ["anna_admin","susan_super"],
    "username" : "john_user",
    "password" : "XXX"
}
| Key | Required | Description |
|---|---|---|
| kimaiAPI | Yes | URL to the Kimai API - example above is from the demo instance from kimai.org |
| ignoreActivities | No | Activities which should be ignored (not copied to Kimai, not deleted when available) can be included as Array-List |
| adminUser | No | The admin tab of the app is only displayed when the logged in user is in this list. When this item is not available, the corresponding tab is visible for everyone. |
| username and password | No | When this is provided through the config, then there is no Login screen. This is only recommended for development purposes or when this application is run just locally by one person. |
Excel Structure Timesheets
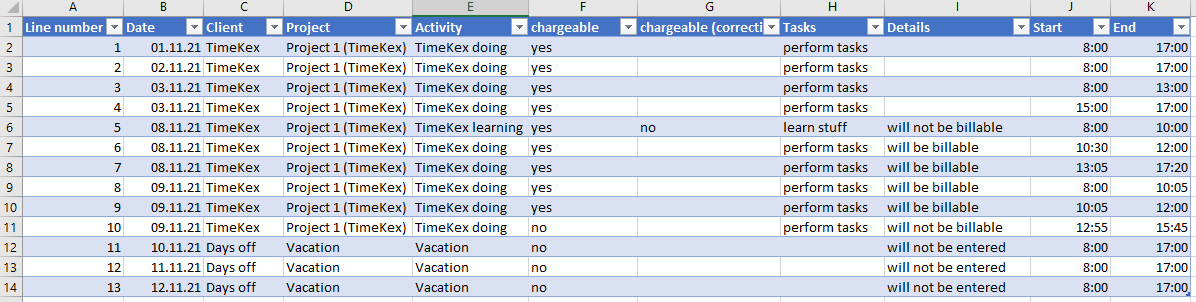
The Excel file is expected in a specific format. When the Excel file should contain a different structure, for example different column names, this can be changed by a source code updated and re-compiling the app. The file src/features/excelImport/ExcelSchema is responsible to read in and map the corresponding Excel file to the specific object required for the application. Feel free to update the column names from the Excel file.
The package read-excel-file is used to read in the Excel file and use the corresponding schema for mapping. Please look into the package details to apply a different schema.
For the Excel file it is very important that the first sheet contains the time data and that the first row starts with the column names. There can be additional sheets and additional columns in the Excel file. The column order is also not relevant. Example file is available under "./exampleFiles"